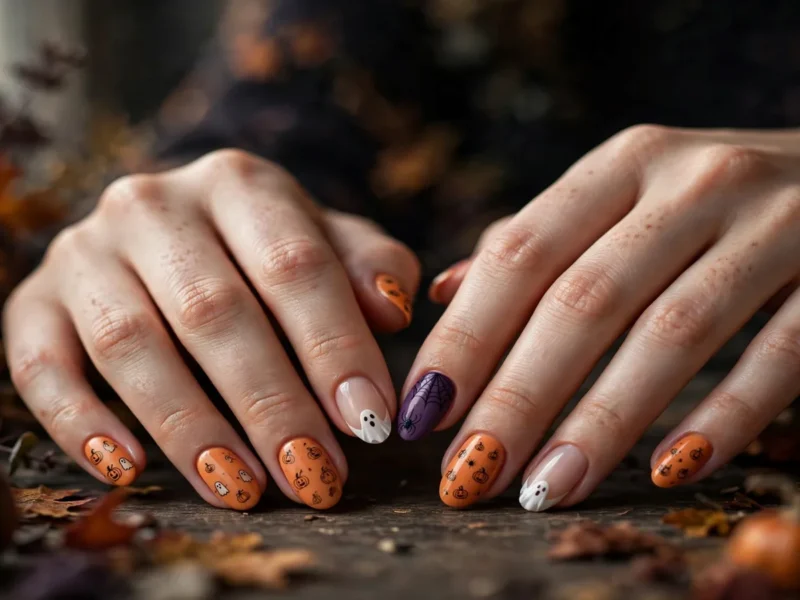
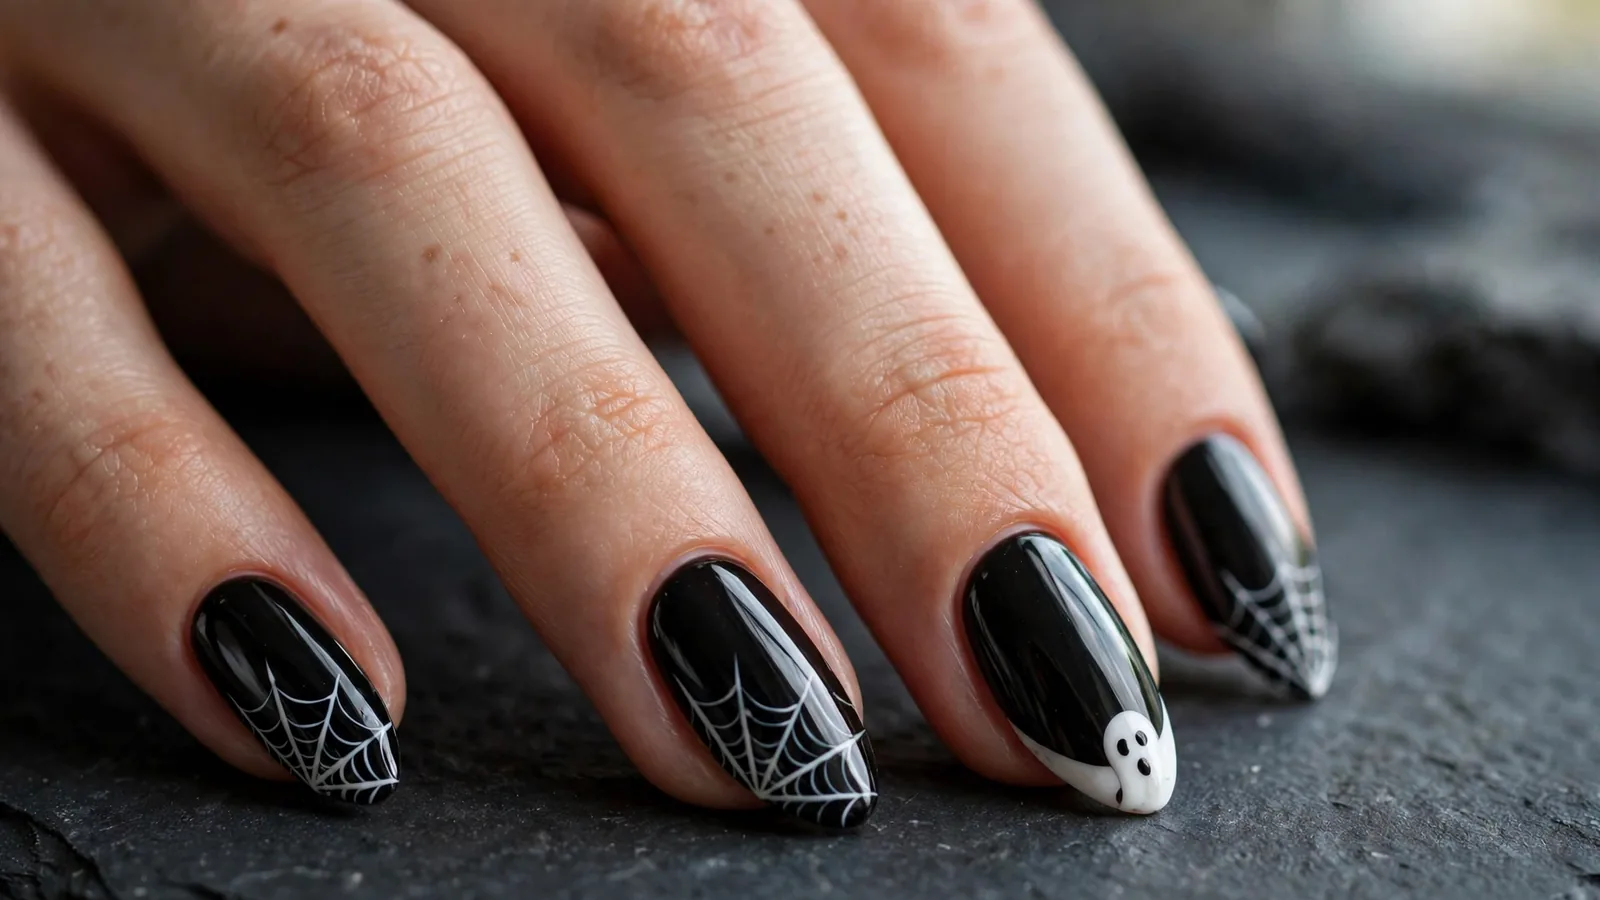
Quick answer: Halloween almond nails work because the shape does half the design work — the tapered point stretches haunted-house silhouettes into a hilltop scene, corner spiderwebs radiate naturally along the taper, and curved French tips melt into ghost shapes with no effort. Below are 18 designs arranged around what almond nails do best, plus a square-to-almond filing tutorial.
Why Is Almond the Best Nail Shape for Halloween?
Almond nails are the best Halloween canvas because the shape gives every design a built-in vanishing point. The wide base holds detailed art — pumpkin faces, cat eyes, mummy wraps — while the soft taper funnels drips, bat flight paths, and web spokes toward the tip like perspective lines in a painting. You get drama without the claw: rounded edges snag and chip far less than stiletto points, so your set actually survives the whole month of October.
The taper also fixes Halloween’s biggest proportion problem. Vertical scenes — haunted houses, moon phases, witch hats — need length to read; on short square nails they compress into blobs. Almond’s elongated silhouette stretches a silhouette scene into a proper little landscape, while still looking elegant enough for the office on November 1. For more almond-specific inspiration, our blue marble almond nails use the same taper logic in an everyday finish. It is the proportion trick that makes Halloween almond nails look salon-designed even when they are DIY.
Almond vs Coffin vs Stiletto: Which Shape Fits Your Halloween Look?
Shape choice is really a trade-off between drama and wearability. This quick comparison maps each shape to the Halloween motifs it flatters most — pick your Halloween almond nails vibe before you pick your polish.
| Shape | Best Halloween motifs | Drama | Wearability |
|---|---|---|---|
| Almond | bats, spiderwebs, ghost French, moon phases, haunted houses | medium-high | excellent — rounded edges resist chips |
| Coffin | blood drips, full ghost faces, skull art | high | good — corners can catch on things |
| Stiletto | fang looks, gothic drips, villain claws | maximum | low — points break and snag |
| Square | candy corn stripes, checkerboard, mummy wraps | low | excellent — but corners chip on art |
Stiletto and coffin read as claws — perfect if the costume needs horror. Almond keeps delicate motifs legible (bats, cats, webs) and photographs elegantly, which is why Halloween almond nails look best for real life, not just photos.
How Do You File Square Nails Into Almonds?
You don’t need a salon appointment to reshape for Halloween almond nails. Going from square to almond takes about ten minutes with a 100/180-grit nail file — follow these steps and check symmetry against the center dot after every few strokes. The one-direction filing method comes from nail educators at Nashly Nails (never saw back and forth — it splits the nail). For the tools, a basic nail shaping and press-on supplies kit covers everything used here.
Step 1: Trim, then mark the center
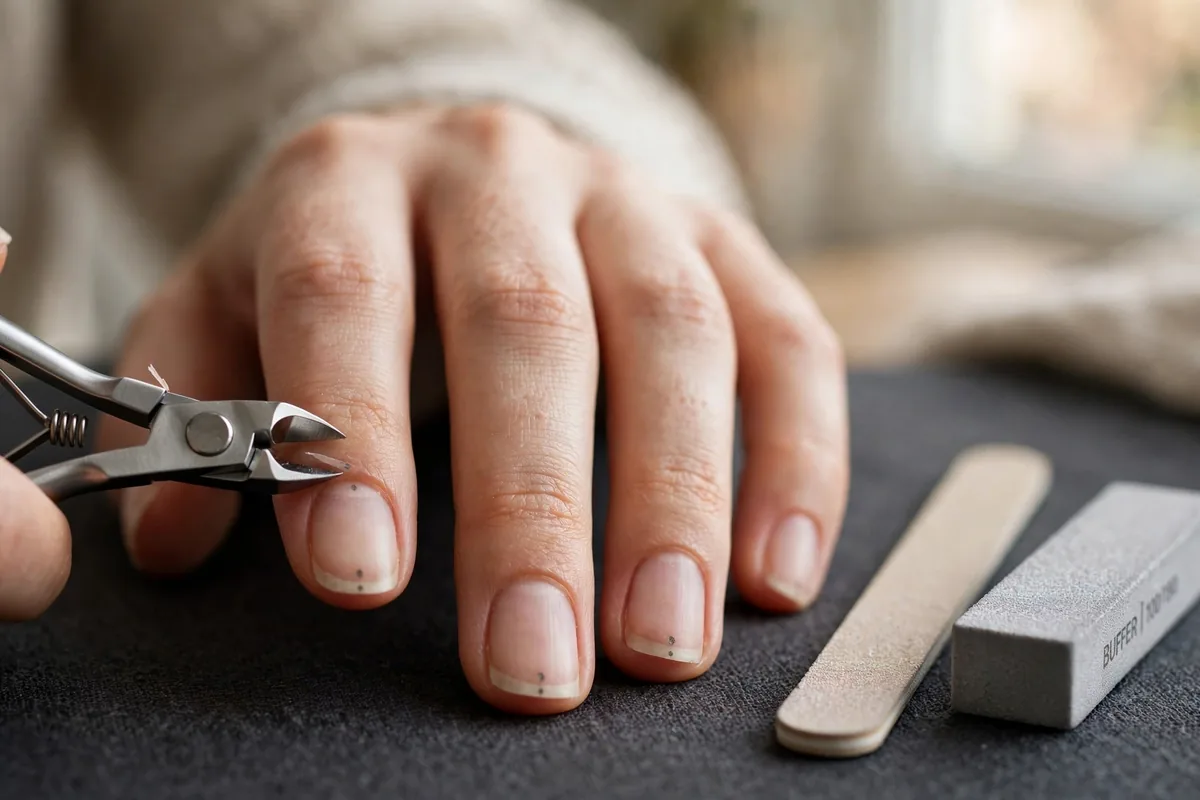
Clip your nails straight across to the final length first — shaping removes more length than you expect, so don’t cut them short. Then mark a tiny dot at the exact center of each nail tip with a pencil or a dab of polish. That dot is your target point; pros use it to keep both sides symmetrical. If your nails are very short, grow them out a little first — almond needs some length to hold the taper.
Step 2: File the sidewalls into a triangle
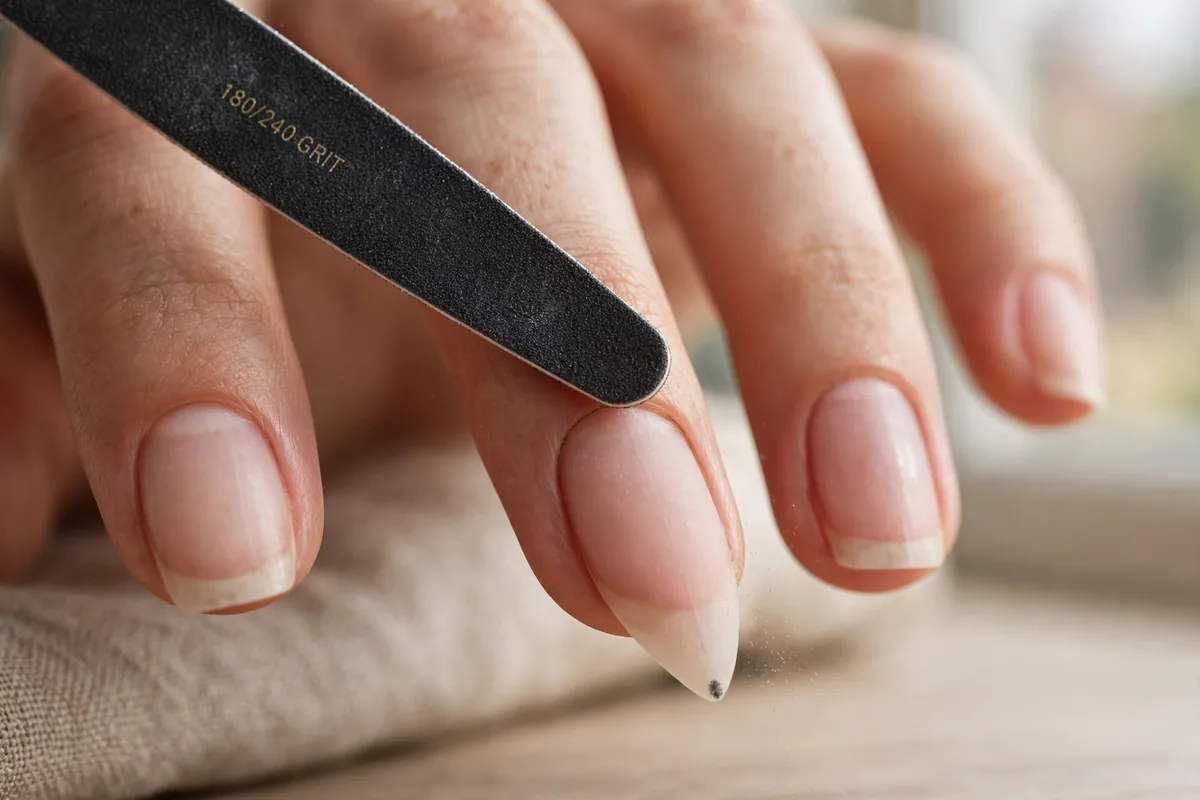
Starting slightly above the stress point (never at the skin), file each sidewall inward toward the center dot in one direction only — never saw back and forth, which splits and weakens the nail. You’re forming a sharp triangle or stiletto point first; don’t try to round it yet. Hold the file perpendicular to the nail for control, and compare both sides against your center dot frequently.
Step 3: Round the point and seal the edge
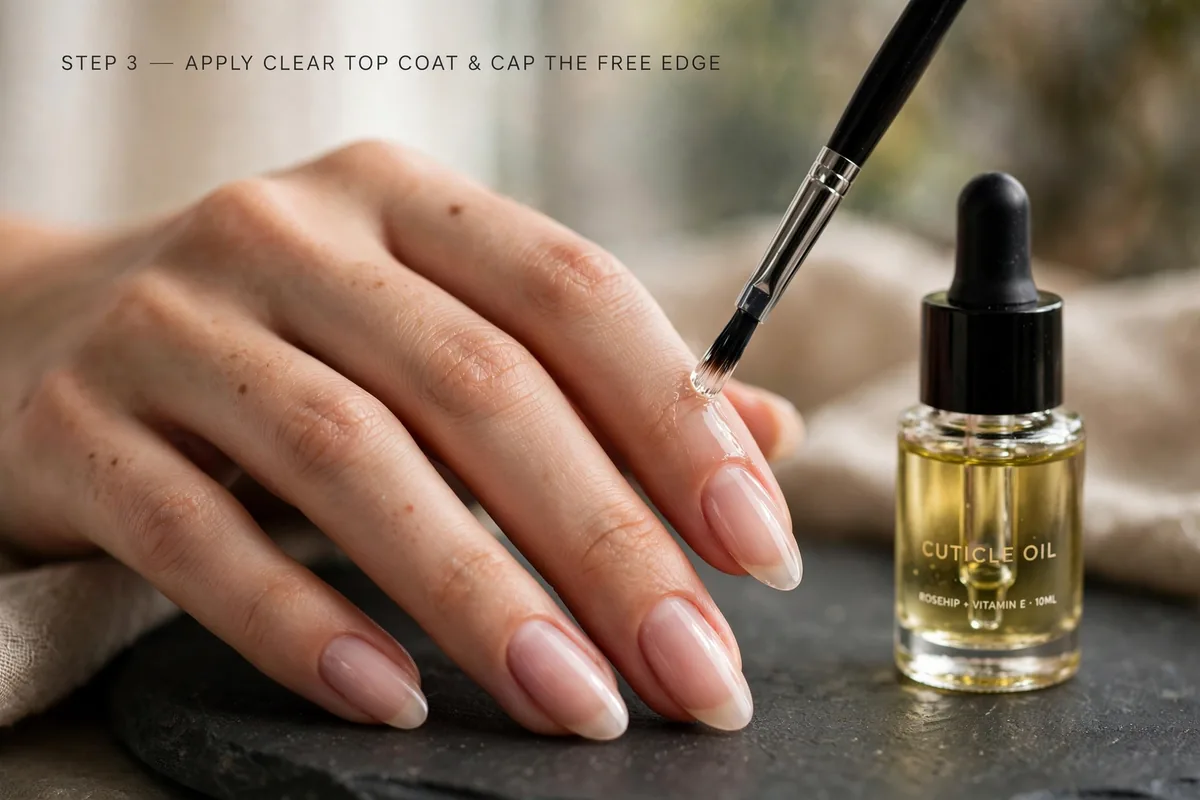
Rock the file gently in a C-curve over the sharp tip to soften it into the almond curve, and round off where the straight side-lines meet the sidewalls. Buff filed edges with a sponge buffer, smooth with a 240-grit file, then apply top coat and cap the free edge — run the brush along the very tip — to seal the layers against splitting. Finish with cuticle oil. Your almonds are ready for their Halloween art.
18 Halloween Almond Nail Designs That Use the Shape
Every design below is built for the almond taper — the motif placement notes explain exactly how the shape carries the art. If you want more October ideas in a different register, our nail aesthetic ideas roundup covers the broader fall mood.
1. Corner Spiderweb on Black
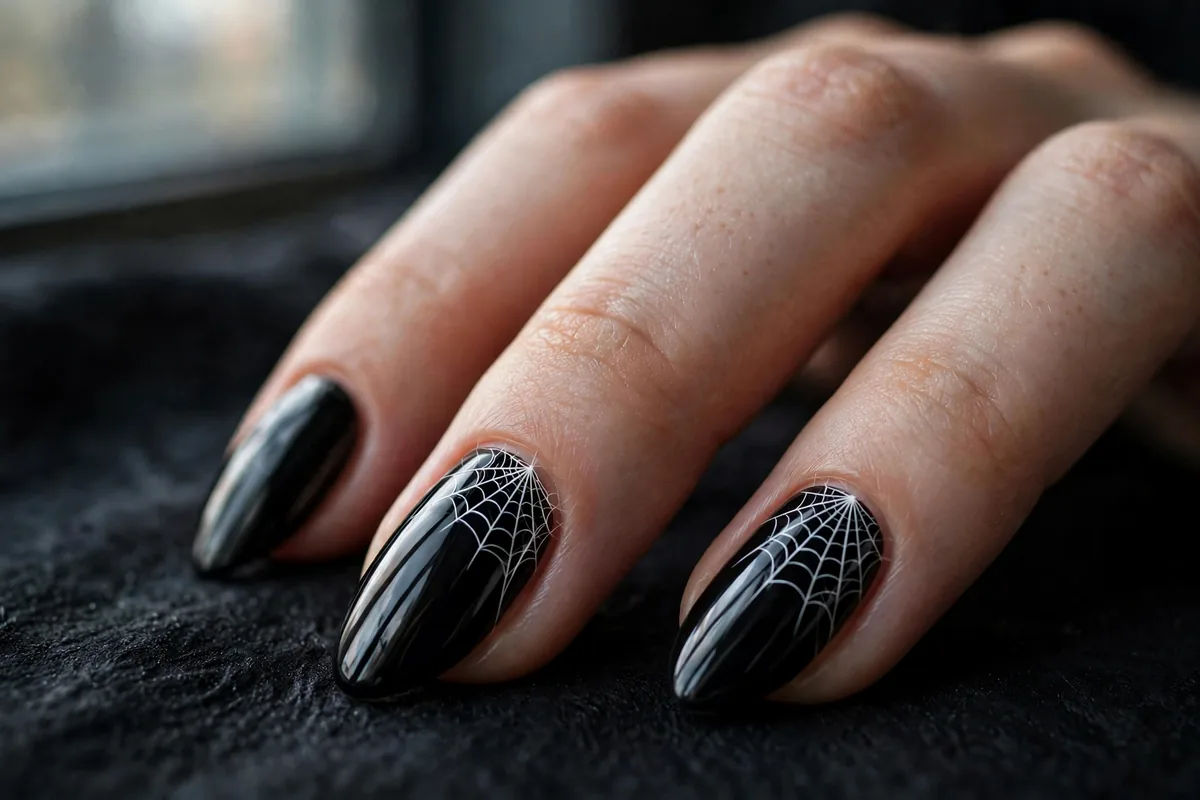
Jet-black bases with a white radial web anchored in the cuticle corner of each accent nail. The almond taper does the geometry for you: draw three or four spokes from one corner with a thin nail-art brush, then connect them with sagging arcs — the lines converge naturally toward the tip like threads pulled taut. Add a tiny spider dot on the middle finger for the full effect.
2. Haunted House Silhouette
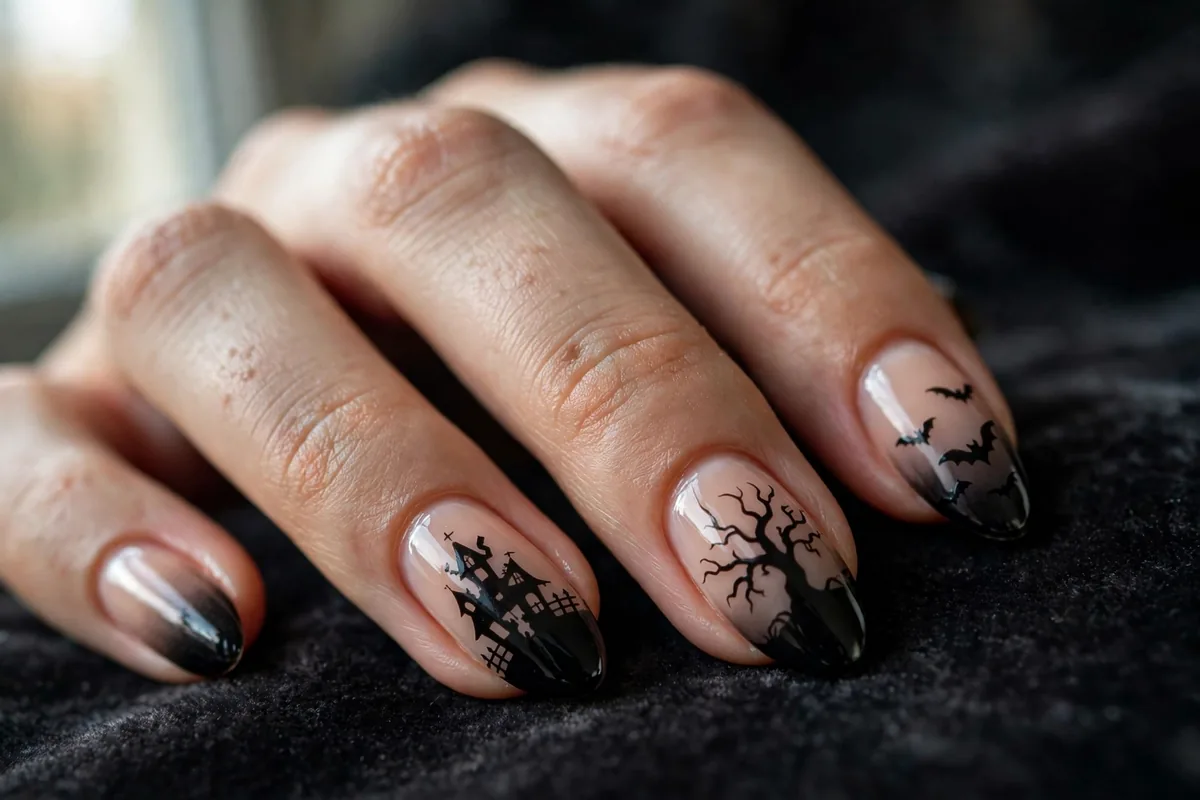
A nude-to-black vertical gradient, dark at the tip, carries a crooked haunted house, bare tree, and tiny bats painted in silhouette along the tip third. This is the design Halloween almond nails were made for: the elongated point gives the scene a hilltop perspective no short or square shape can fit. Hand-paint it with a detail brush or cheat with water decals under gel top coat.
3. Ghost French Tips
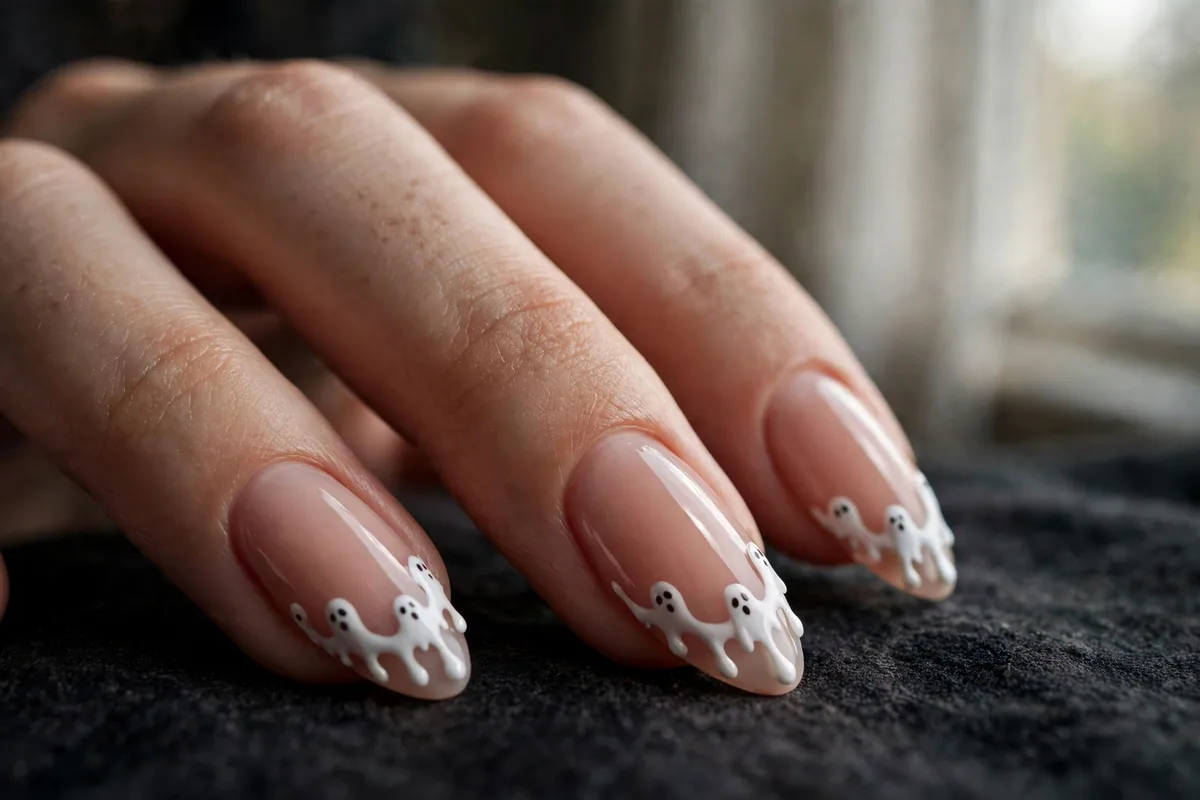
Classic white French tips where each tip edge melts into a little ghost — paint the white tip, then pull the polish down in a wavy hem with two black dot eyes. The almond’s curved smile line makes the ghost’s “sheet” look completely natural, as if it drapes over the nail. Elegant enough for the office, spooky enough for October 31. These Halloween almond nails are the set I’d recommend to a skeptic.
4. Candy Corn Gradient
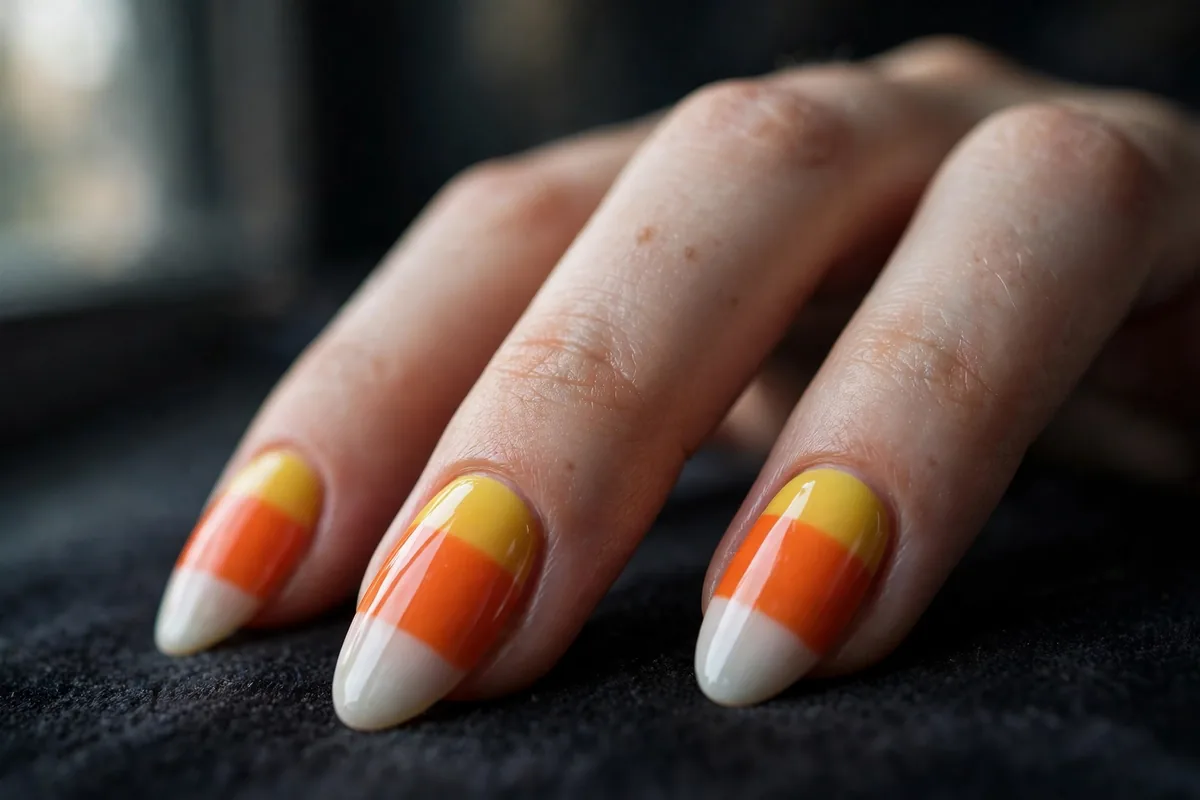
Tip-to-base bands in candy-corn order — white tip, orange middle, yellow base — sponge-blended for a soft melt between colors. Following the almond taper, each color band narrows like the candy’s wedge, which sells the illusion better than it ever looks on square nails. Seal with a glossy top coat; the candy finish needs shine to read. One of the easiest Halloween almond nails looks to DIY with a makeup sponge.
5. Black Cat Faces
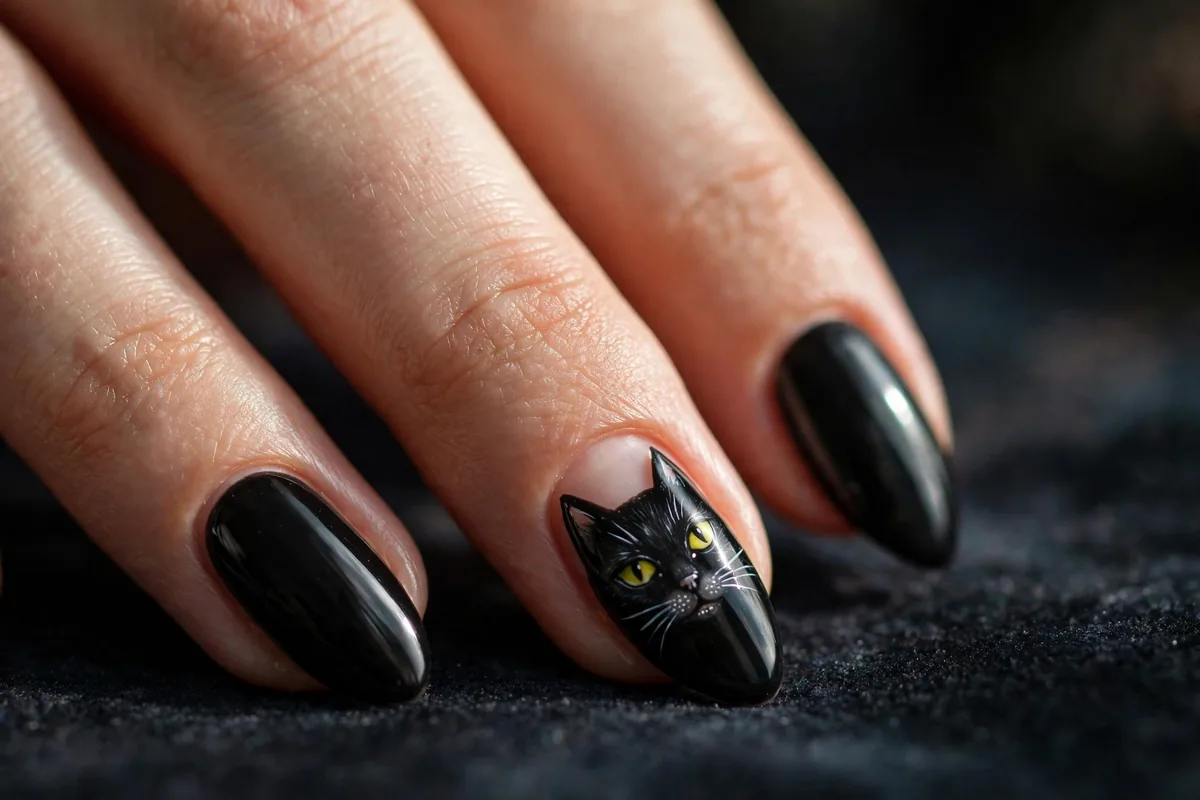
Glossy black bases; on two accent nails, paint a black cat face in negative space. The trick is letting the almond tip form the cat’s pointed ears — then you only need yellow or green slit-pupil eyes and three whisker lines per side. Keep the other nails solid black so the faces stay the star. A dotting tool handles the eyes; a striping brush handles the whiskers. The pointed-ear trick is why black cats rank among the most-requested Halloween almond nails every October.
6. Pumpkin Jack-o’-Lantern Faces
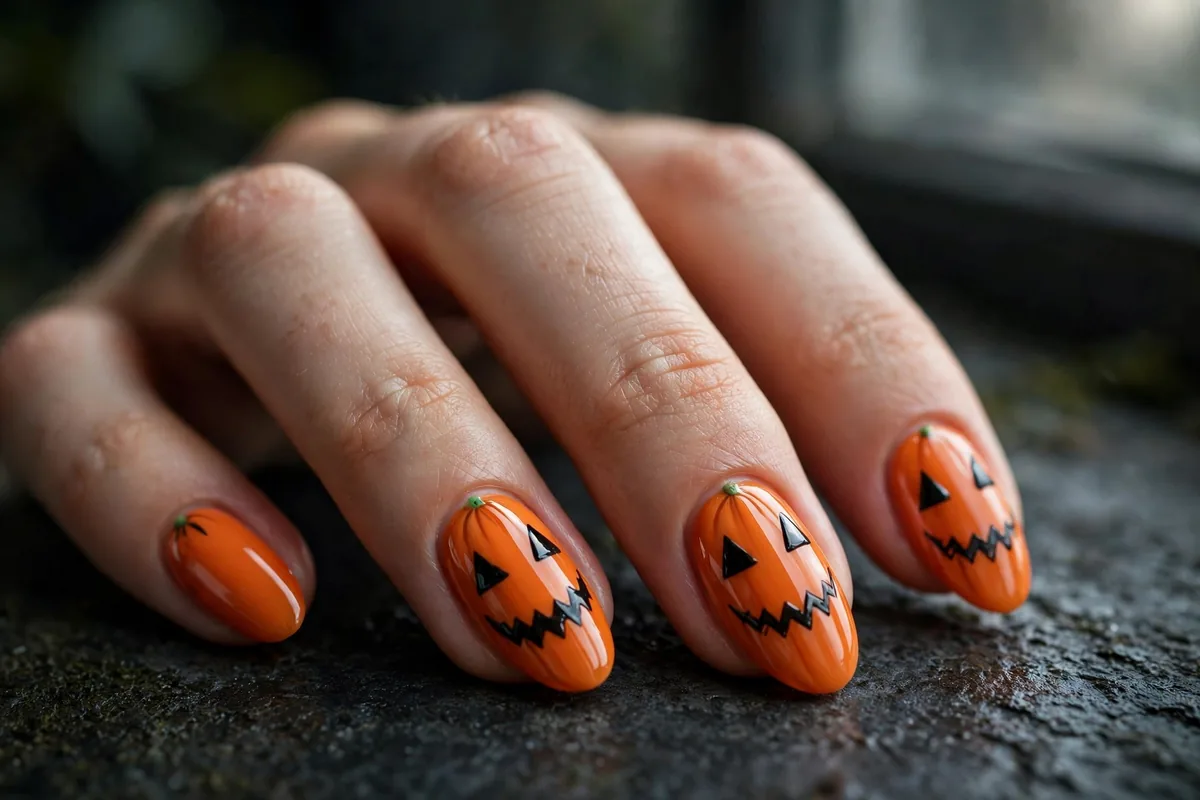
Pumpkin-orange creme base, black triangular eyes and a zigzag grin on the upper half of the nail, with a green stem dot at the cuticle. On almond, the round pumpkin face sits centered while the taper suggests the pumpkin’s ridges — a proportion win you lose on coffin. Two thin coats of orange keep the black linework crisp on top. Finish with glossy top coat for a just-carved glow.
7. Mummy Wraps
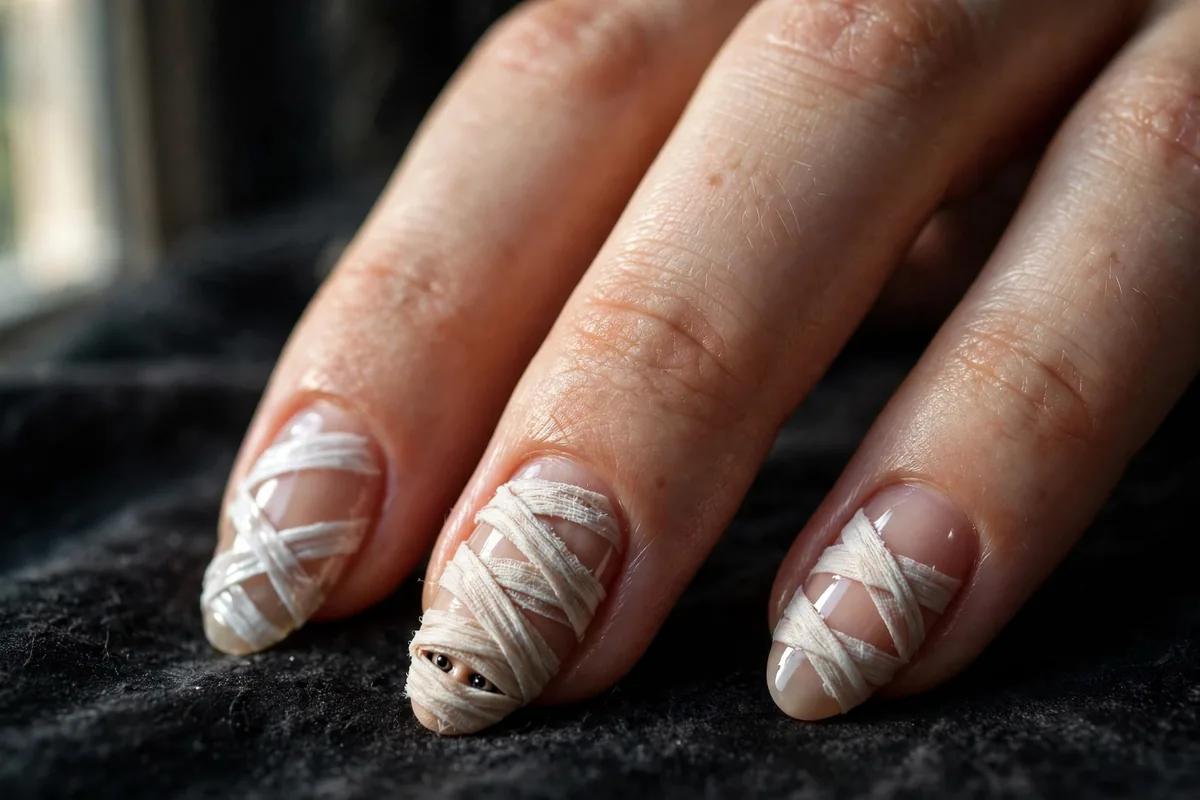
Nude base wrapped in uneven white bandage strokes, with two tiny black eyes peeking through a gap near the tip. Angle the “bandages” diagonally so they spiral down the taper like real linen wraps — parallel stripes look flat, but a diagonal wrap has movement. Leave one wrap slightly open on the ring finger for the eye reveal; these Halloween almond nails read instantly as a mummy from across the room.
8. Flying Bat Silhouettes
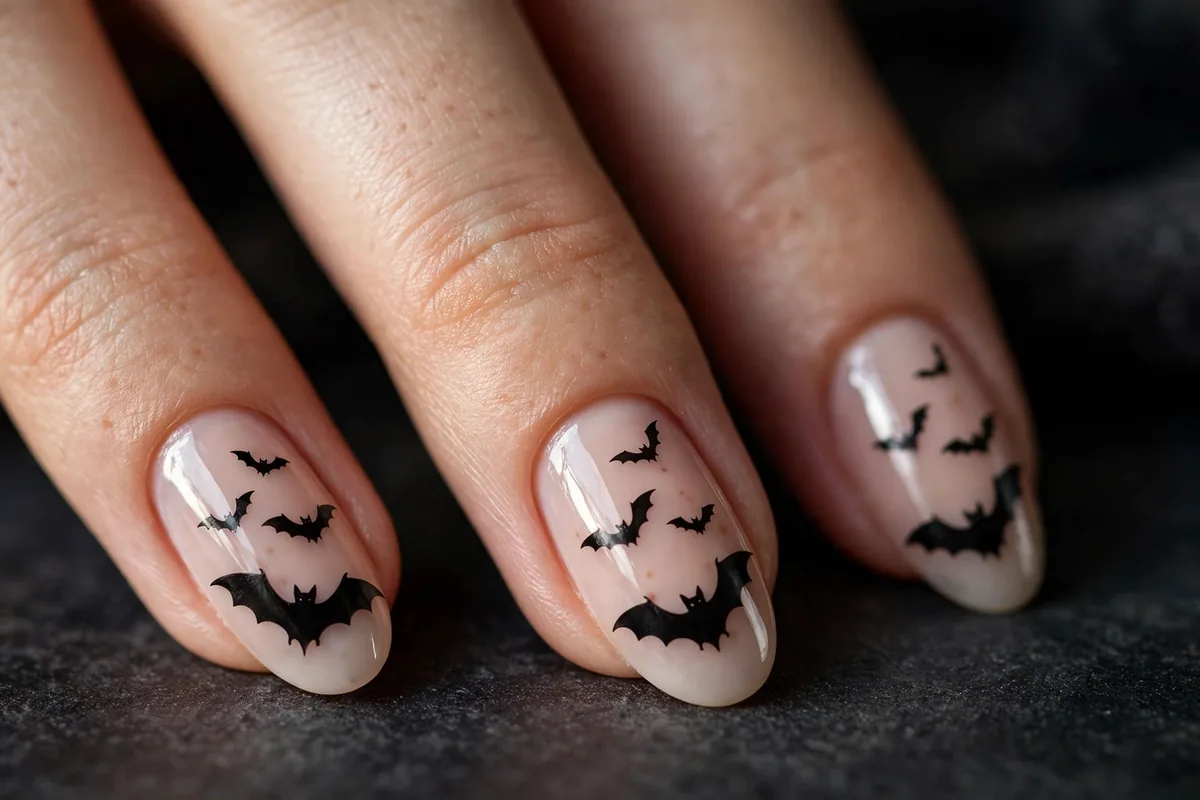
Milky or sheer nude base with two or three black bats in varying sizes scattered mid-nail. Place the largest bat at the nail’s widest point and let the smaller ones “fly” up the taper toward the tip — the eye follows the narrowing shape and reads it as motion. Stamp them with a Halloween stamping plate or draw simple curved-wing bats with a detail brush. Medium-length Halloween almond nails keep the silhouettes legible.
9. Blood Drip Tips
Sheer nude or milky base with glossy crimson drips bleeding down from the tip edge. Use a detail brush to pull three or four drips of uneven length toward the cuticle — vary the lengths, because uniform drips look stamped. The almond tip concentrates the “blood” at the point, so the drip flow reads darker and more dramatic exactly where the eye lands. A high-gloss top coat is non-negotiable here; matte kills the wet look. Glossy, gory, and among the most-photographed Halloween almond nails of the season.
10. Blood-Red Mirror Chrome
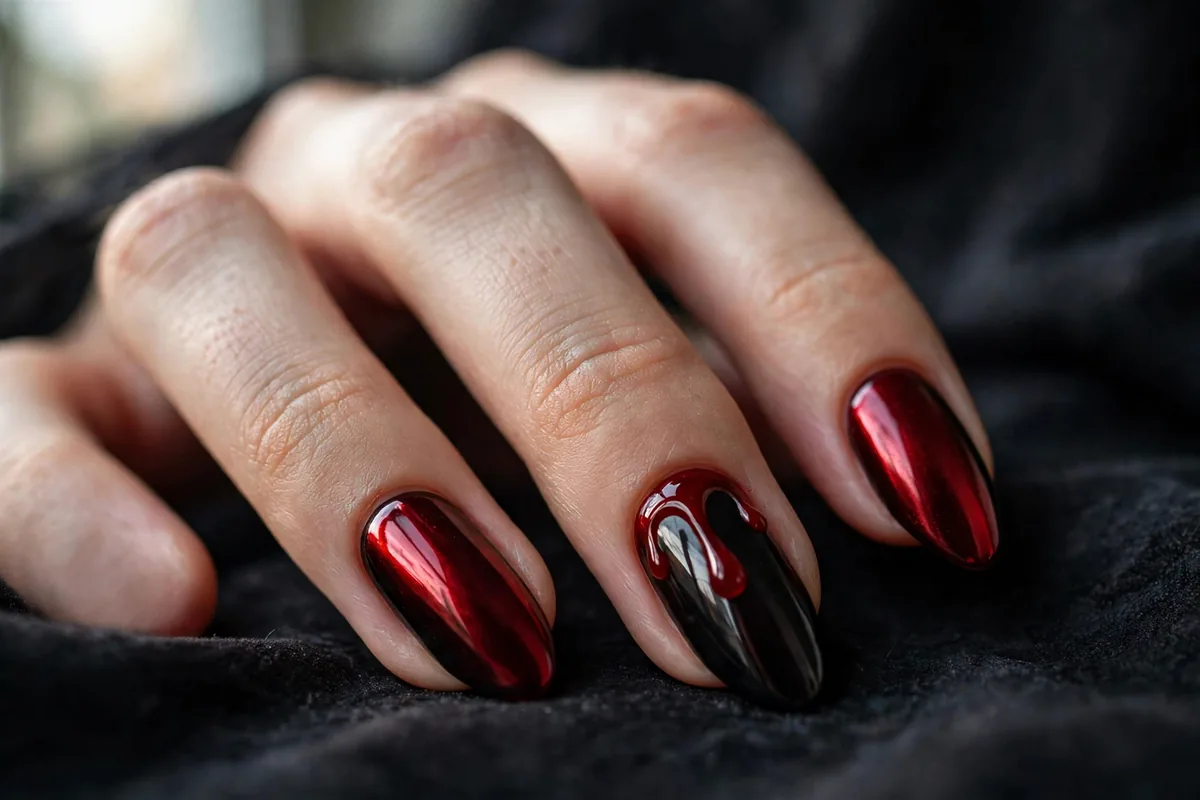
Full mirror-chrome powder over a black base coat on all ten nails, with one accent nail carrying a blood-red drip along the cuticle edge. Chrome shows every ridge, so buff the nail smooth before the base coat and flood a no-wipe gel top coat over the powder — chrome scratches fastest of any finish. The liquid-metal surface with one wound of red is the most expensive-looking Halloween almond nails set on this list.
11. Tortoiseshell + Gold Web
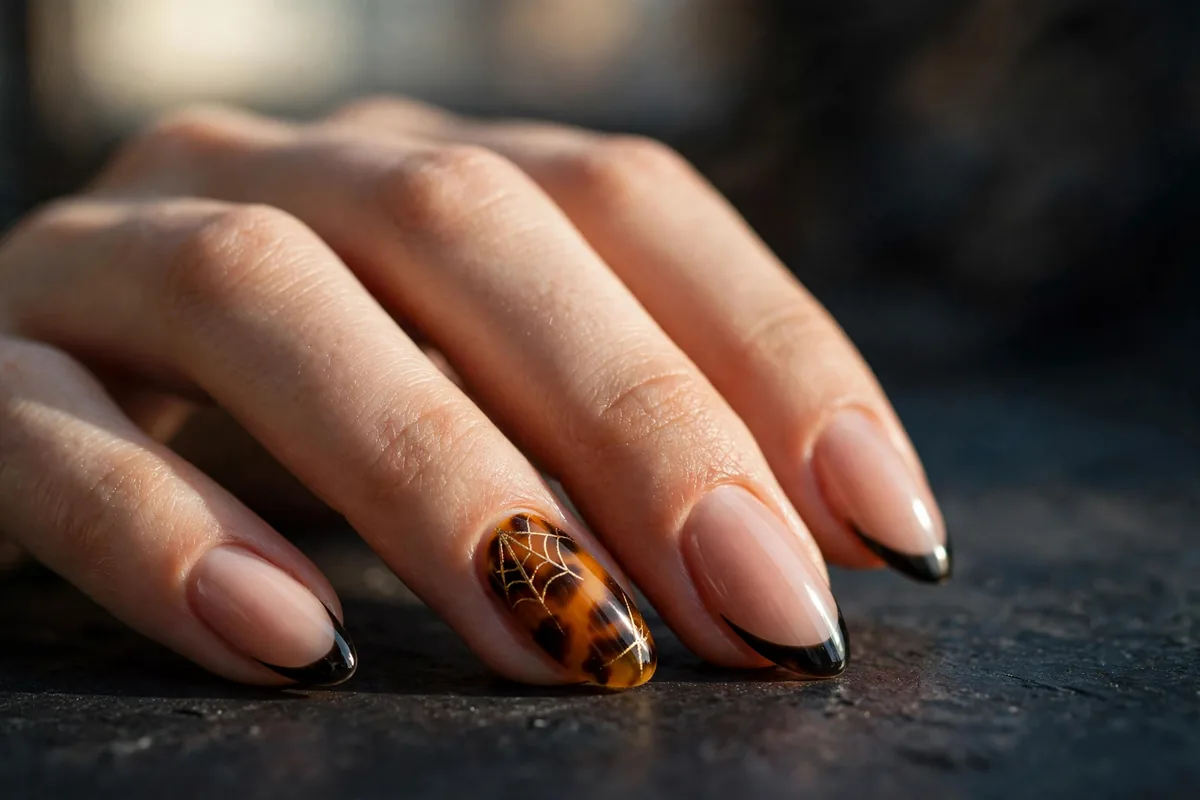
Warm amber tortoiseshell on two accent nails — layered translucent browns and blacks built in thin passes — with fine gold spider-thread lines drawn across the amber. Keep the remaining nails nude with black French tips so the tortoise reads as jewelry, not noise. The gold threads catch light as the hand moves, which is the whole point of choosing metallic linework over black here. Understated Halloween almond nails for anyone who wants October elegance without the costume vibe.
12. Bloody French
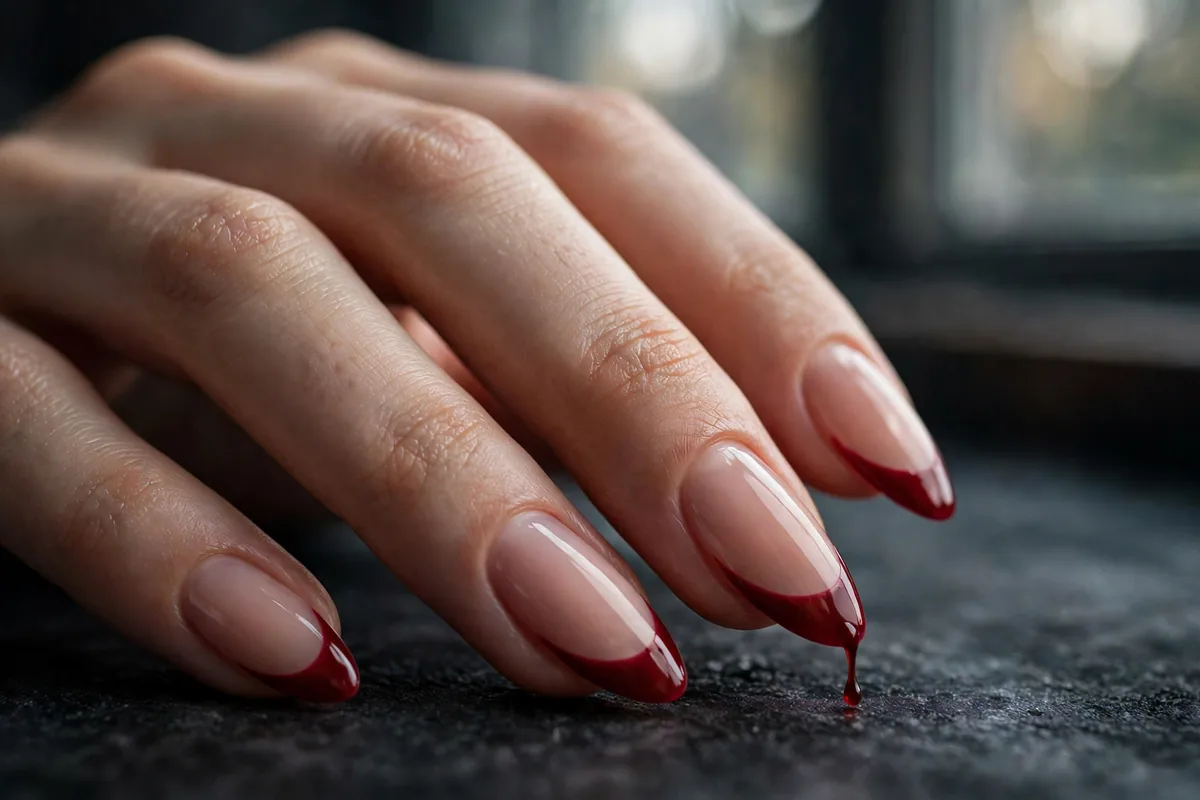
Deep red French tips on a nude almond base, with one thin darker-red drip falling from a tip corner on the ring finger. Keep the smile line slightly thicker than a classic French — the “blood” needs enough width to read at a glance. Of all Halloween almond nails ideas, this is the most office-defensible: from two feet away it’s just a red French manicure.
13. Moon Phase Progression
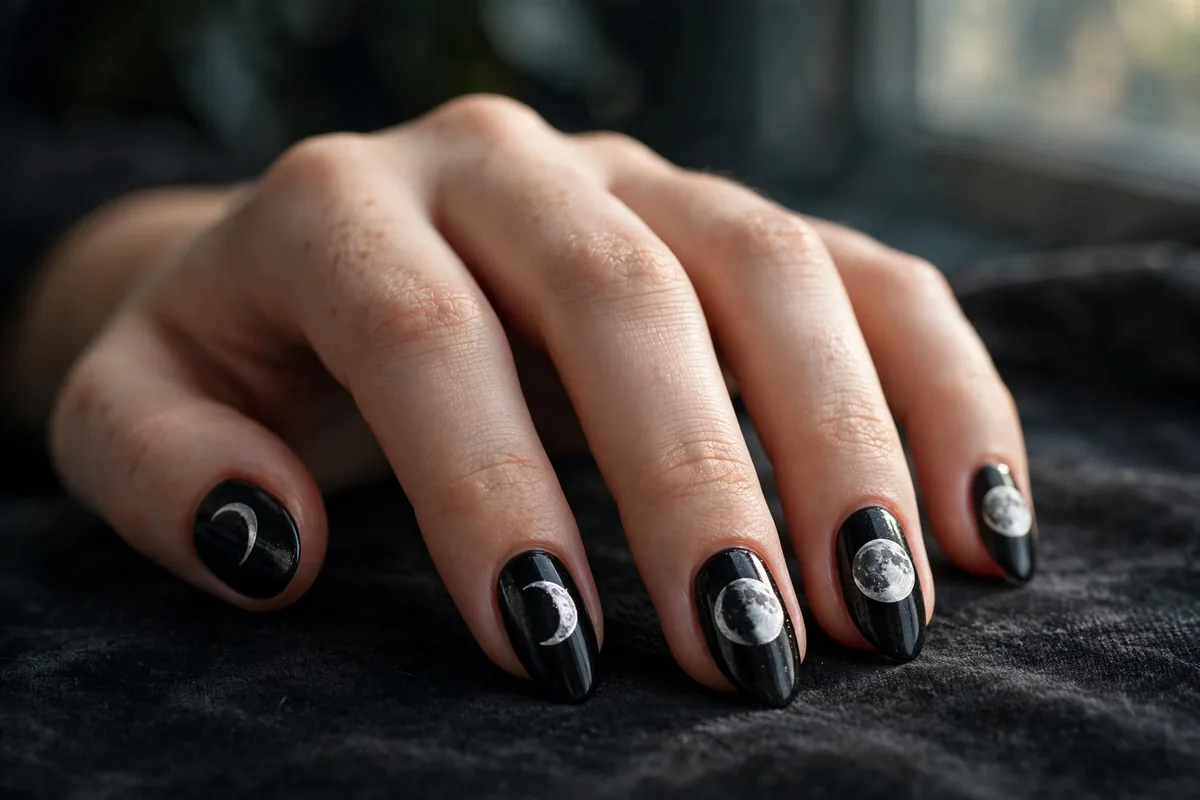
Black base across all five nails, each carrying one moon phase in silver-white — crescent to full to crescent, sequenced thumb to pinky so the full moon lands on your longest finger. Use a dotting tool in two sizes for the moon discs and paint the shadow side with the black base. No competitor gallery we found does the full phase progression; crescent-moon accents are everywhere, the sequence is not — making it a true original among Halloween almond nails.
14. Witch Hat Accent
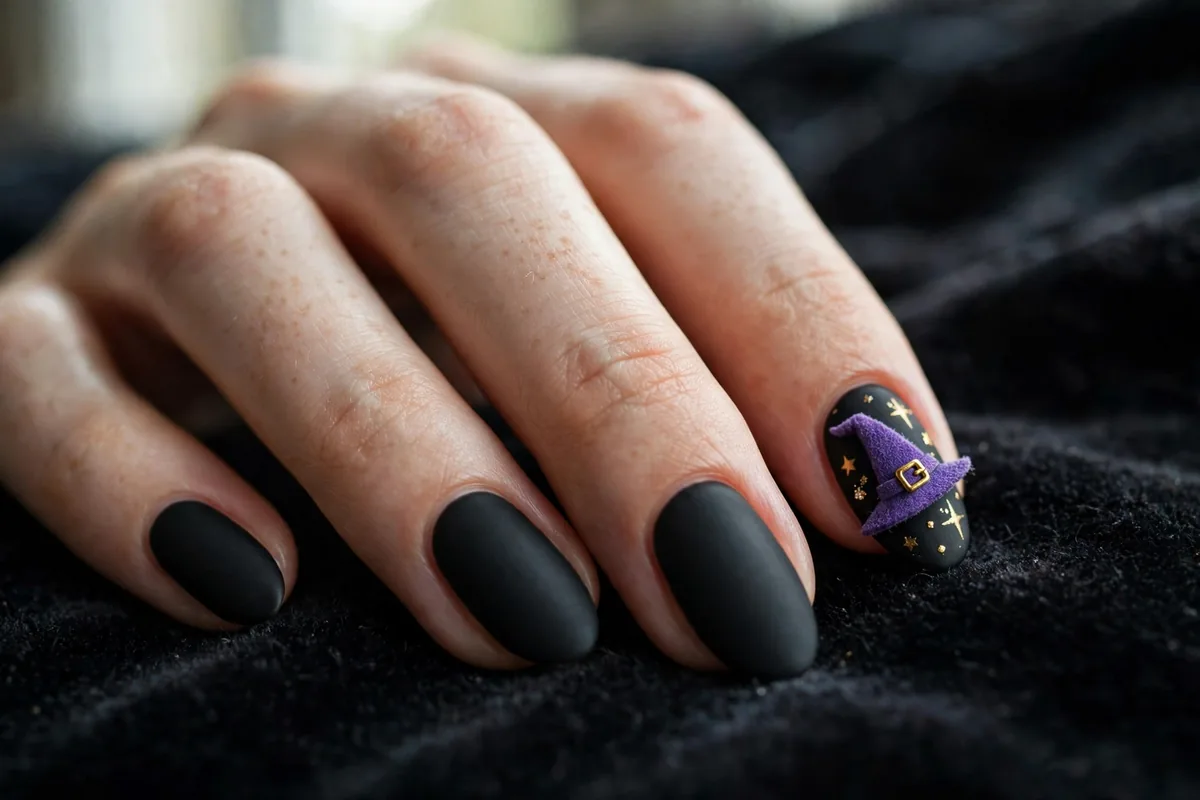
Matte black base; on the ring finger, a purple witch hat tilted across the tip so the cone follows the almond taper, with a gold buckle band at the nail’s widest point and tiny star dots scattered around it. The taper makes the hat look like it was designed for the nail rather than shrunk onto it. Keep the other four nails matte black — restraint is what makes the accent pop. A single-motif statement among Halloween almond nails that rewards a steady hand.
15. Candy Apples
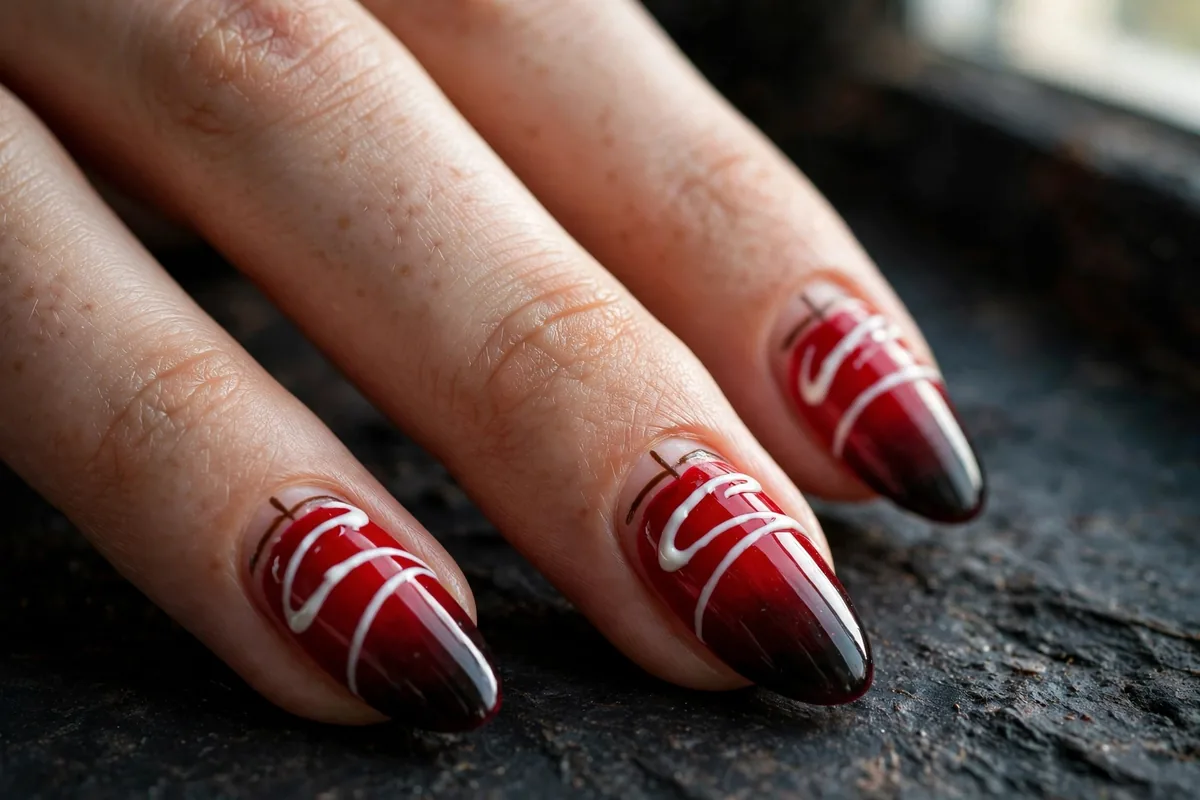
High-gloss candy-apple red base with a darker red “dipped” gradient at the tip, a brown stick line painted at the cuticle, and thin white drizzle swirls across the red. The glassy finish sells the caramelized look — this design lives or dies on shine, so double up on glossy top coat. Candy corn gets all the attention in Halloween nail art; candy apples are the fresher pick among Halloween almond nails.
16. Cobweb French
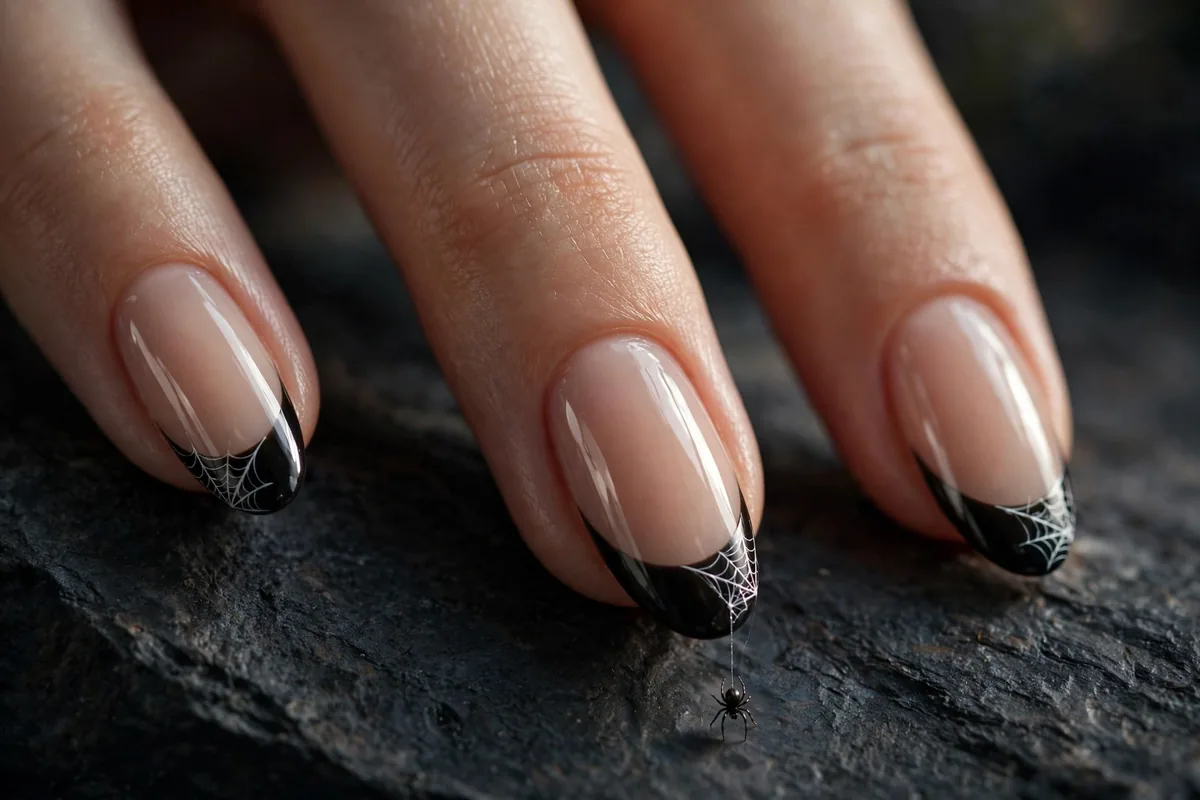
Nude base with black French tips, then a delicate white cobweb spun across one corner of each black tip — and on the accent nail, a tiny spider dangling from a single thread. Chic from a distance, creepy up close: the definition of a stealth Halloween manicure. These Halloween almond nails prove you can wear spiderwebs to a wedding if the base stays nude and the web stays fine.
17. Glowing Ghosts
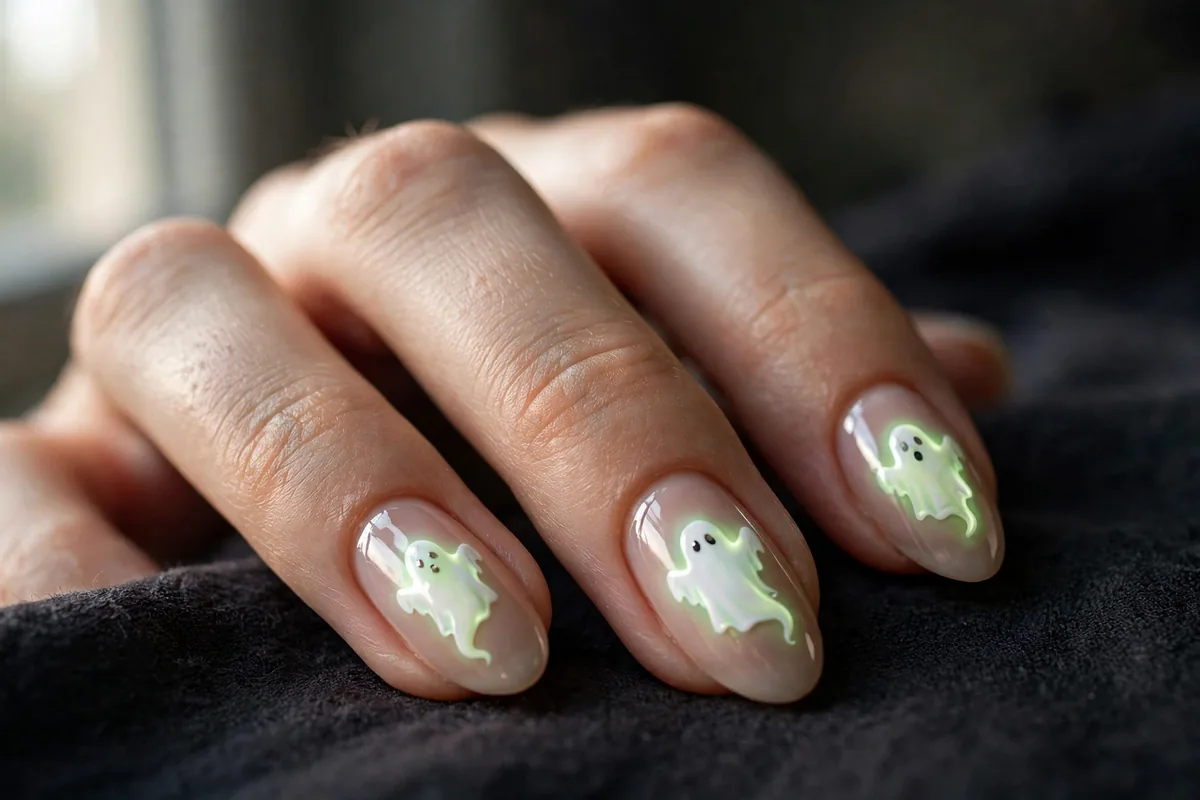
Nude base with ghost silhouettes painted in glow-in-the-dark white-green pigment — it charges in daylight and glows at the party, with black dot eyes so the face reads in both states. Apply the glow pigment over a white base coat for maximum charge, and seal it well; glow pigments are chunkier than regular polish. Cute ghosts are everywhere this October, but glowing Halloween almond nails stop conversations.
18. Ombre Blood-Orange
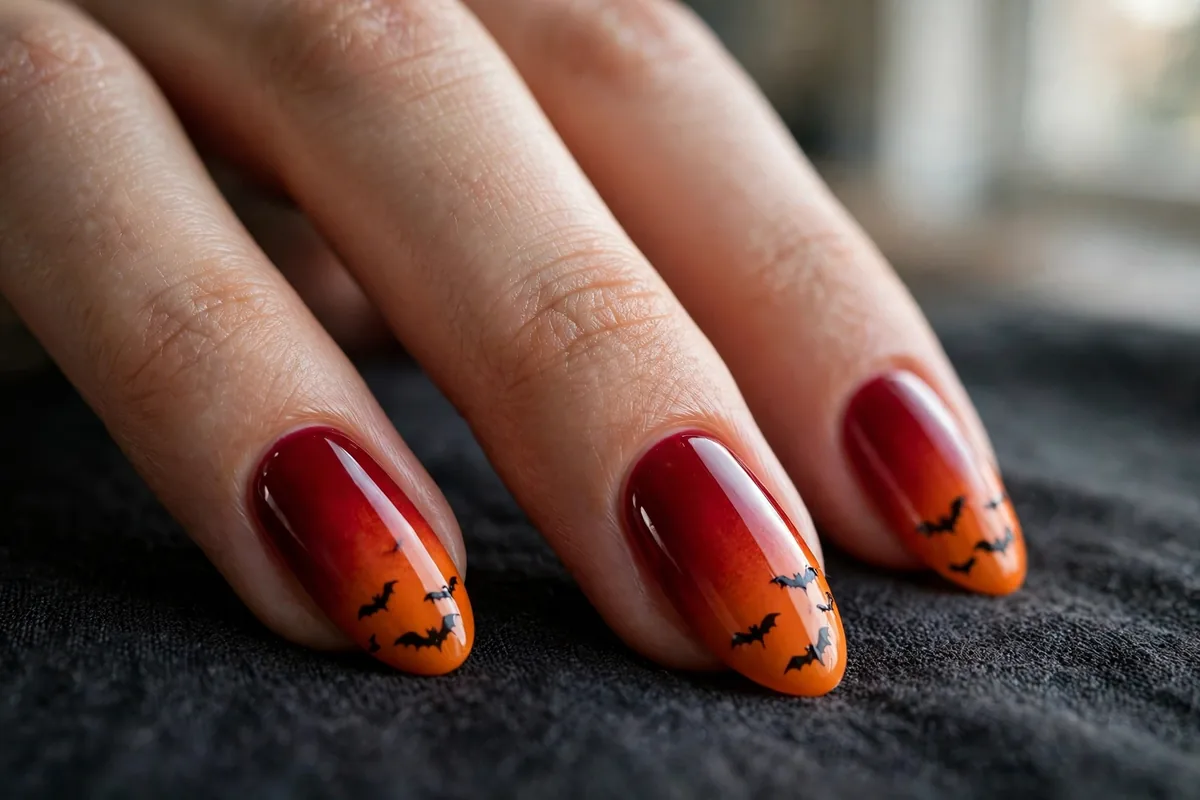
Sponge-blended ombre from deep blood red at the cuticle melting into pumpkin orange at the tip, finished glossy. The almond length gives the gradient room to transition smoothly — short nails force the blend into a muddy middle, which is why this gradient belongs on Halloween almond nails. Optional: tiny black bat silhouettes stamped over the orange zone once the ombre is dry. Seal with top coat and cap the free edge to keep the gradient from wearing at the tip first.
📌 Found your favorite?
Pin this post to your nail board so the design is waiting when you book your Halloween appointment.
How Long Do Halloween Almond Nail Designs Last?
Expect 2–3 weeks from a gel manicure, 5–7 days from regular polish, and 1–2 weeks from well-applied press-ons — enough to cover the entire spooky season. The almond shape helps here: with no sharp corners to catch, edge wear starts later than on coffin or stiletto. Whatever your base, cap the free edge with every layer including top coat, reapply top coat every three days, and wear gloves for dishes and cleaning.
Chips happen most on the art itself, so keep a tiny bottle of your base color for touch-ups on your Halloween almond nails — a dab of black or nude under fresh top coat hides most damage invisibly. If you want the set to survive past Halloween, skip the glow pigments and blood drips for the last week; they’re the first details to wear.
FAQs
Are almond nails good for Halloween nail designs?
Yes. The almond shape gives you a wide base that tapers to a soft point — plenty of room for detailed art while looking elegant rather than costume-y. The tapered sides naturally slim fingers and give spiderwebs, drips, and silhouette scenes a built-in vanishing point that no other shape offers.
What nail shape is best for Halloween — almond, coffin, or stiletto?
It depends on the vibe. Stiletto and coffin are the most dramatic for horror looks like blood drips and ghost faces because they read as claws. Almond suits delicate motifs — bats, black cats, spiderwebs, ghost French — and survives October better since rounded edges chip and snag less than sharp points.
How long do Halloween almond nails last?
Gel manicures last 2–3 weeks; regular polish lasts 5–7 days. Well-applied press-ons last 1–2 weeks and can cover the whole spooky season. Seal with a quality top coat, cap the free edge with every layer, wear gloves for chores, and touch up chips promptly to stretch wear.
What are the best colors for spooky Halloween almond nails?
Black is the classic go-to for an eerie base, but deep blood reds, oxblood, purples, and poison greens take the look beyond cliché. For cute-spooky, try milky white, pumpkin orange, and soft nude with black detail work. Glossy art over a matte base adds dimension without extra products.
Can I do Halloween almond nails at home without professional tools?
Absolutely. A nude or black base, a thin nail-art brush, and a dotting tool cover most designs — ghosts are just white blobs with dot eyes. Nail stickers, water decals, and press-ons deliver salon-looking results with zero painting skill; seal everything under top coat for durability.
Which one are you trying first? Tell us in the comments — and if you loved these, keep exploring: